Harvest Apron
- Madison Tyndall
- Mar 15
- 3 min read

I haven't made an apron since I first started sewing - almost three years ago! I was inspired to make this one because I'm planning on having a garden this year and thought the apron would be useful when harvesting everything. Aprons are a good starter project for individuals new to sewing because it's a good way to ease into garment making without having to delve into a complicated pattern. Sewing this apron, I could tell just how much I'd learned over the past few years. I'm excited to get some use out of it once the weather warms up!
This past week, I've started eggplant seeds and tomato seeds indoors. I'm planning on starting watermelon seeds at the end of the month. To those who have had a garden before - did you have a favorite fruit or vegetable to grow? Or eat? I love strawberries, but for some reason they never do well when I plant them. Maybe I'll stick to buying those from the store for now.


Materials:
Fabric
Two pieces 35 inches long x 30 inches wide (for main apron pouch)
One piece 77 inches long x 6 inches wide (for waistband)
Two pieces 35 inches long x 3 inches wide (for front ties)
4 inch piece of bias tape
Clothes iron
Basic sewing supplies (machine or needle, thread, scissors, etc.)
Instructions:
*Seam allowance is always 3/8 inch unless otherwise stated.
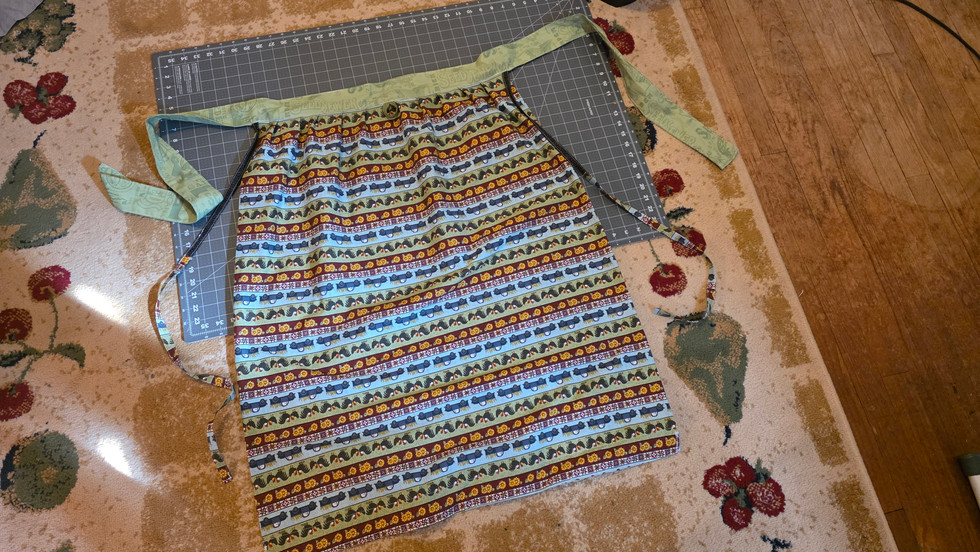
If you haven't already cut out your fabric pieces, cut them out now (refer to materials list for sizes). Place your two largest pieces against each other (right sides together) and sew along the sides and bottom. *Don't sew all the way up the sides, leave about a two inch space at the top of each.
Turn the piece right side out. Iron down the edges and also iron raw edges at the top/side inward so they won't be seen.

Sew a buttonhole in the center of the front-top area where the ties will come out on the finished apron.
Sew the open parts shut, leaving the openings on either end for the tying strings to pass through. Sew a straight line a few inches from the top to form a tube. Refer to the pictures as needed. Iron everything down afterwards.


Place your two front tie pieces for your apron against each other (right sides together). Sew (length-ways) along the sides. Turn right side out. Tuck in ends and sew the ends shut. Iron flat.
Place your two waistband pieces for the apron against each other (right sides together). Sew along the top (length-ways) and the sides (width), but don't sew along the bottom yet. Turn right side out. Iron flat.
Take your piece of bias tape and stitch up both sides of it (length-ways).
Mark where the middle of your waistband is and mark where the middle of your apron is (at the back). Line these up and pin the center into place. Slide the apron piece in between the waistband pieces using the opening left from before. Tuck the front tie strings into the waistband as well.
Slowly sew the waistband shut, securing everything in place. As you go to sew the apron into it, fold little bits of the apron as you go along to form pleats (see picture below for what the pleats look like). It doesn't have to be super exact, I did about five pleats on either side of the center. When you get to the center of the apron, insert the bias tape (looped). Sew over it a few times to secure, then continue sewing the waistband.


This part is optional, but as I was trying the apron on and seeing how it fit, I noticed it was kind of difficult to tie. This was mainly due to the weight of the fabric and the fact that I made the ties a little short. To solve this, I decided to add a little button to one side of the waistband, and a couple buttonholes to the other side. This way I can button the apron in place before tying it. This makes it fit much better and feel more secure, in my opinion. However, it isn't completely necessary, so you don't need to do it if you don't want to.

Fold the front part of the apron up, matching the front with the back piece and sew up the sides. Leave a couple inches of space at the top, so the ties have plenty of space. If you haven't already, thread those front ties through the tube you made at the top of the apron pouch. Tie together.
Iron any seams you haven't ironed yet, trim any excess thread pieces, and give the apron an over all look to make sure you haven't missed a step. Your apron should be complete at this point. Happy harvesting (eventually, when warmer weather comes)!


Comments