Ladybug Purse
- Madison Tyndall
- Sep 13, 2025
- 2 min read

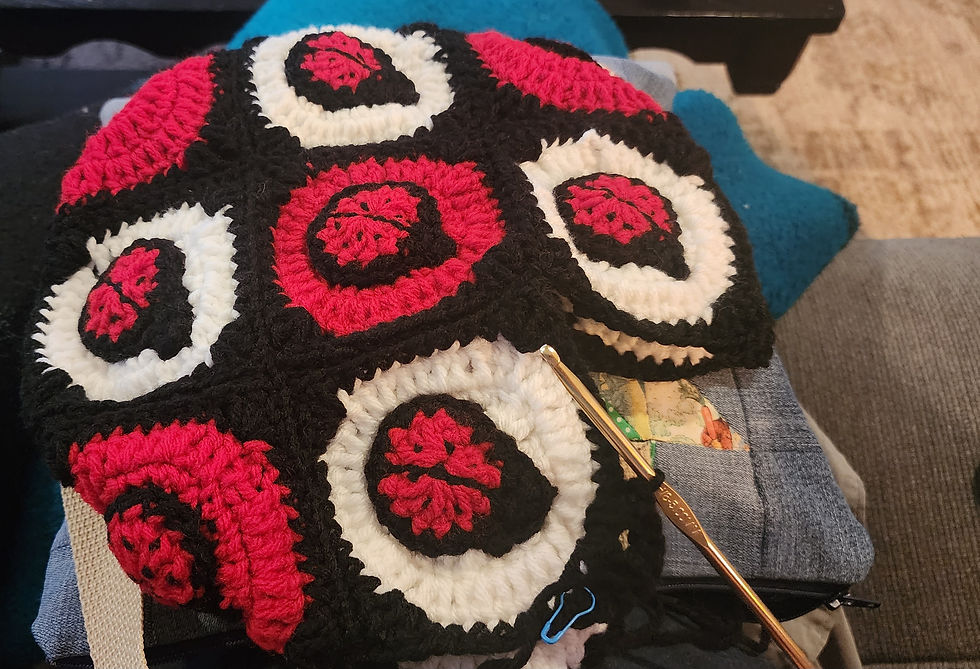
Crochet purses are so much fun to make! If I didn't make them for others, I would definitely have a stack of crochet purses just sitting somewhere due to my overproduction. This is one I made recently for someone else and I love how it turned out! The black, white, and red provide nice contrast in the overall look of this purse. Also, the little ladybugs are just too cute! At one point, I was just carrying around a bag filled with crocheted ladybugs with me for a few days because I was working on other parts of the purse!
If you have any ideas for other purses I could make, please let me know! I also have instructions for a mushroom purse on the blog that's been popular recently.

Materials:
Medium weight acrylic yarn (or any medium weight yarn of your choice)
Black
White
Red
5mm crochet hook
Scissors
Crochet needle
Pattern Instructions:
For the center circles of the squares (you need 13 of these- 8 in white and 5 in red):
Round 1: Make a slipknot. Chain 4. Slip stitch together to form a ring. Ch. 3. DC 11.
Round 2: Slip stitch. Ch. 3. DC. Increase every stitch. (24)
Round 3: Slip stitch. Ch. 3. DC. Increase every 2nd stitch. (36)
Chain 1, cut, and knot to finish.
Repeat for other circles.

For the circle border (to make them squares):
Connect border yarn to one of the circles on the outside round (I like to knot it). Chain 3. SC 7.
In the next stitch you will DC 2, chain 2, and DC 2. All in the same stitch.
SC 8.
DC 2, chain 2, and DC 2 in the same stitch.
SC 8.
DC 2, chain 2, and DC 2 in the same stitch.
SC 8.
DC 2, chain 2, and DC 2 in the same stitch.
Slip stitch to connect. Chain 1, cut, and knot to finish.
Repeat for all other squares.

For the ladybug applique (12 total):
Round 1: Make a magic circle. Chain 1, then DC 12.
Pull end to tighten the circle center. Switch color of yarn to black.
Round 2: SC all the way around. When you reach where you started, begin SC back the other way. Only do this for a couple of stitches, then reverse. Chain 1, cut, and knot.
Using black thread and your needle, embroider a line down the center of the ladybug and add ladybug dots. Tie ends in the back to secure.
Repeat for all other ladybugs.
Use your needle and black thread to sew the finished ladybugs onto the squares you've made. See the picture below for reference.

Once all the ladybugs are attached to the squares, sew the squares together to form the body of the purse. Remember, you're sewing them together in a diamond pattern, not squares. Look to the picture (at the top of this page) for reference if needed.
For the straps:
SC 3 rows of black along the top of the purse.
Chain 40 where you want the first handle to start.
SC 5 rows, connecting to the bag at the end of each row.
Repeat on other side for second handle.


Comments