Strawberry Patchwork Tote
- Madison Tyndall
- Jun 7, 2025
- 2 min read

This tote turned out so cute! I love how the patchwork strawberries look against the denim. This would be the perfect tote to take to a farmer's market this summer or on a family trip! Feel free to add squares or change some of the measurements to make it bigger, I wanted a smaller bag, so I didn't add a border or anything like that. I hope this post inspires you to make a strawberry patchwork tote as well!

Materials:
Red scrap fabric
Green scrap fabric
An old pair of jeans or denim fabric
About 1/2 yard of fabric for inner lining
12-inch zipper (any color you want)
Strap(s) for tote handles
Basic sewing supplies (scissors, cutting mat, thread, etc.)
Instructions:
Cut out squares from each fabric for the patchwork. You will need to cut:
17 red squares (2.5 x 2.5 inches each) + 3 red squares (3 x 3 inches each)
2 green squares (2.5 x 2.5 inches each) + 4 green squares (3 x 3 inches each)
16 denim squares (2.5 x 2.5 inches each) + 5 denim squares (3 x 3 inches each)
Pay attention to the measurements!


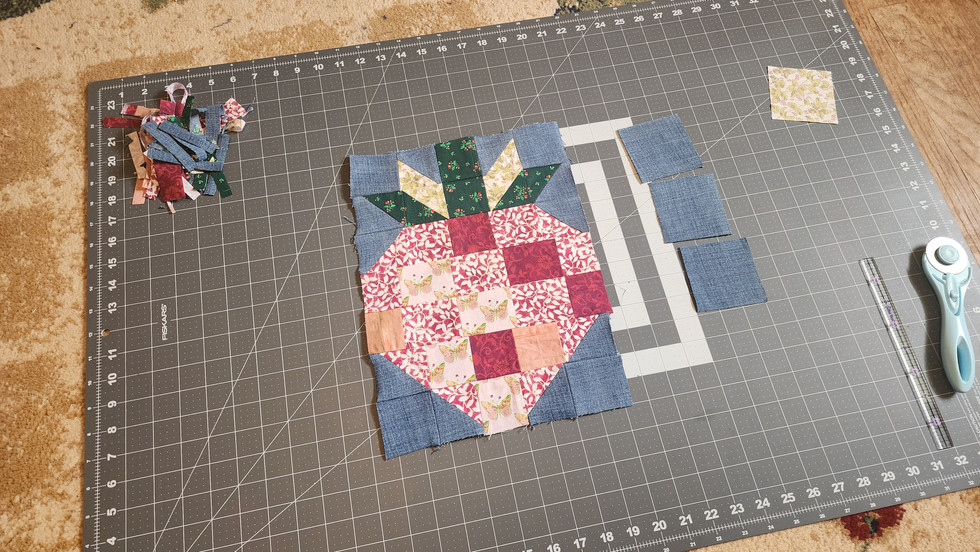
Cut the larger 3 x 3 in. red squares in half (triangles, not rectangles). Lay out the red pieces how you want your strawberry to look, then start adding in the denim pieces (those larger squares can be cut in half too).
Sew together the halves where it is needed (see image below), and piece together the strawberry, bit by bit (1/4 inch seam). I started with the red and denim, then moved on the the green and denim and connected everything at the end.
Repeat for the other side of the tote bag.


Cut out two pieces of fabric for the inner lining of the tote bag. Measure so the pieces are about the same size as your strawberry panels. Pin the pieces together (lining against strawberry), right sides facing outward.
Quilt each pinned piece together, so the pins are no longer needed. Nothing fancy, just straight stitch in the ditch, vertical first then turn and do the horizontal lines. You should end up with a criss cross pattern on the back of each panel (see the image below).


Attach the zipper in between the two fabric panels. I added tabs on either side of mine, but it's not necessary.
If you haven't yet, cut your straps for the tote handles. I bought this strap material from a craft store, but I've also used old belts for tote handles. Or, you can make our own with extra fabric. When you're ready to attach your handles, place them where you want them to sit on your tote bag. Sew the handles firmly in place.


After the handles are finished, pin them onto the bag (so they stay in place and don't accidently get sewn down). Then place the strawberry sides of the tote against each other, pin them down, and sew around the edges of the bag (5/8 inch seam).
Turn the bag right side out again, zip it up, and the strawberry tote is complete!


Comments